
Lesson 3: Word Document Formatting
Goals for This Lesson
- Set up your Microsoft 365 account
- Learn the basic formatting features in Word
- Create a document with the same layout as the sample, using your own topic
- Use Manus AI to check your document's formatting
- Continue typing practice
1. Microsoft 365 — Account Setup and Word
At university, Microsoft Word is used for writing reports and documents. Let's set up your Microsoft 365 account first.
1-1. Create your Microsoft account
- Visit the university's Microsoft 365 guide
- Follow the instructions to create your university Microsoft 365 account
- Make a note of your password so you don't forget it
Free while enrolled!
Tokyo Polytechnic University students get free access to Microsoft 365 (Word, Excel, PowerPoint, etc.) throughout their enrollment.
1-2. Launch Word
- Open Word from the desktop app, or go to Microsoft 365 Online
- Click "Blank document" to confirm you can create a new document
2. Check the Finished Example
First, download the sample file and open it to see what the finished document looks like.
Download the Sample File
Click Word基礎サンプル.docx to download it.
▼ Overview of the Sample Document
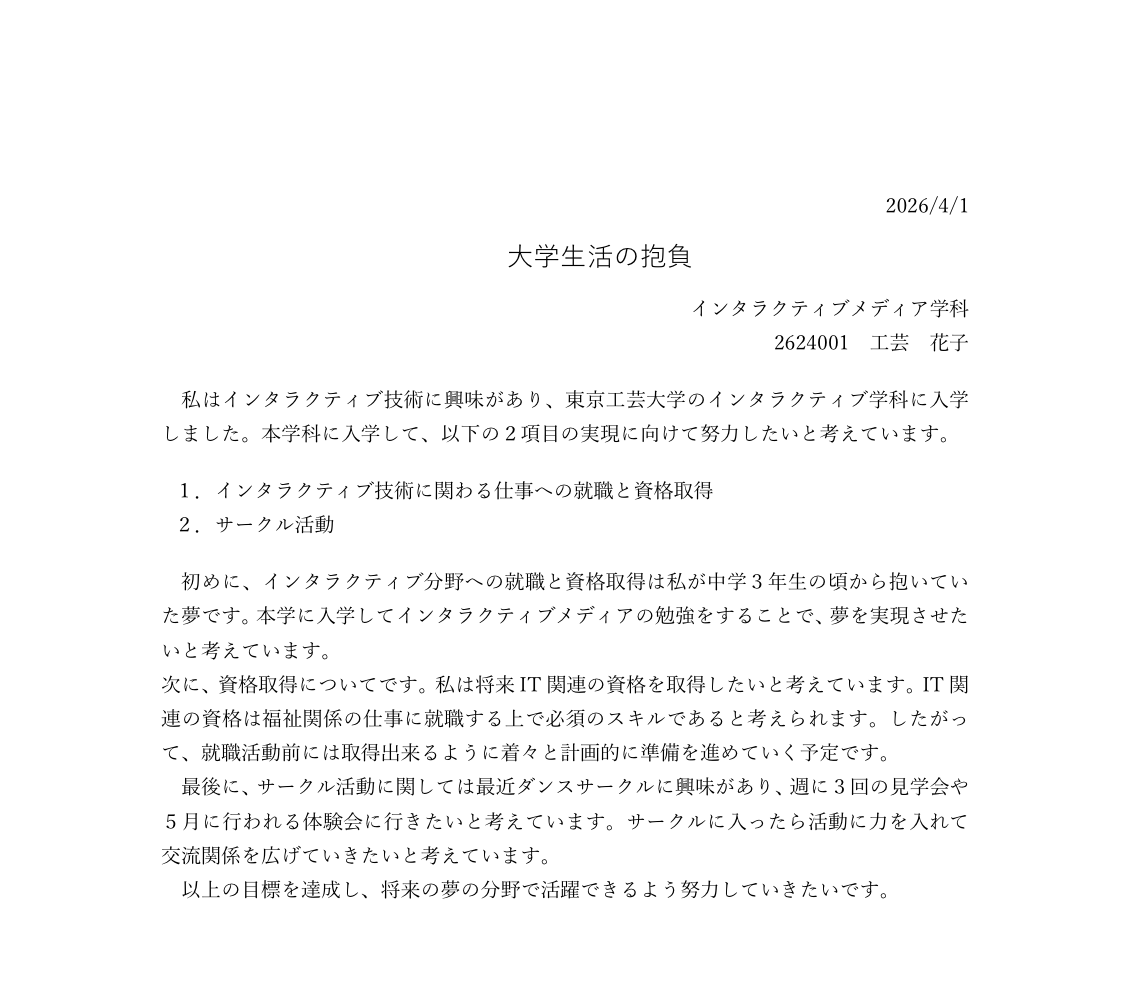
2-1. Structure of the Sample Document
The sample document has the following structure:
| Element | Formatting |
|---|---|
| Date | Right-aligned |
| Title | Yu Gothic font, 14pt, indented |
| Department name | Right-aligned |
| Student ID & Name | Right-aligned |
| Body text | Justified, first-line indent on each paragraph |
| Numbered list | Paragraph numbering (numbered list) |
2-2. Page Setup
The sample document uses the following page settings. Take a moment to check them.
| Item | Setting |
|---|---|
| Paper size | A4 |
| Margins | Moderate |
How to Check Page Setup
Go to "Layout" tab → "Margins" to view or change settings.
3. Learn Word Formatting
Let's learn each formatting technique step by step, using the sample as a reference.
3-1. Changing the Font
How to change the font (typeface) of text.
Steps:
- Select the text you want to change by dragging over it
- Click the Font name box in the "Home" tab (the box showing the current font name near the top-left)
- Type the font name you want or choose from the list
Common Fonts:
| Font | Use | Features |
|---|---|---|
| Yu Gothic | Titles & headings | Bold and eye-catching. Good for short text |
| Yu Mincho | Body text | Easy to read. Good for long passages |
| Times New Roman | English body text | Standard serif font |
| Arial | English headings | Standard sans-serif font |
Serif vs. Sans-serif
- Serif fonts (Yu Mincho, Times New Roman) → Use for body text (long passages)
- Sans-serif fonts (Yu Gothic, Arial) → Use for titles and headings (to stand out)
3-2. Changing Font Size
How to change the size of text.
Steps:
- Select the text you want to resize
- Click the Font size box in the "Home" tab (the box showing a number)
- Type a number or choose from the list
Sizes Used in the Sample:
| Element | Font Size |
|---|---|
| Title | 14pt |
| Body text | 10.5pt (Word's default) |
3-3. Text Alignment
Set whether text is aligned to the left, center, right, or both edges. In the sample, the date, department, and name are right-aligned, while the body text is justified.
▼ Header section of the sample (note the alignment of date, title, and name)

Steps:
- Place your cursor in the line (paragraph) you want to change, or select multiple lines
- Click the alignment buttons in the "Home" tab → "Paragraph" group
Types of Alignment:
| Button | Name | Use |
|---|---|---|
| ≡ (left) | Left align | Regular text |
| ≡ (center) | Center align | Titles |
| ≡ (right) | Right align | Dates, names |
| ≡ (both) | Justify | Body text (both edges align evenly) |
What is "Justify"?
Justified alignment makes both the left and right edges of each line align neatly. This gives the document a polished appearance, so it's commonly used for body text in reports and essays.
3-4. First-line Indent
"Indenting" means shifting the first line of a paragraph slightly to the right. In Japanese writing, it is standard to indent the first line of every paragraph by one character width. The sample document shows this clearly.
▼ Body section of the sample (note the first-line indents and numbered list)
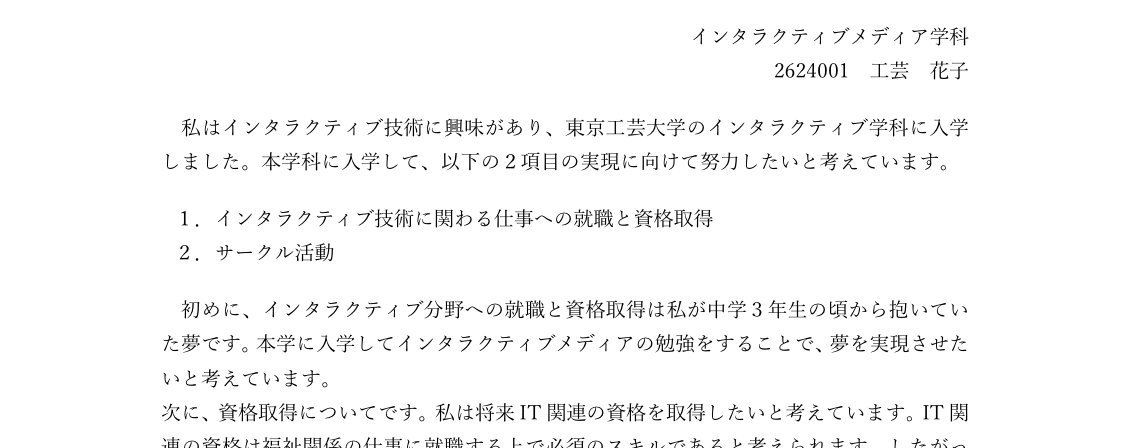
Method 1: Using the Space key
- Place your cursor at the beginning of the paragraph
- Press the full-width space key once
Method 2: Using Indent Settings (recommended)
- Place your cursor in the paragraph you want to indent (or select multiple paragraphs)
- In the "Home" tab → "Paragraph" group, click the small arrow (dialog launcher) in the bottom-right corner
- The "Paragraph" dialog box opens
- Under the "Indents and Spacing" tab, set "Special" to "First line"
- Set the "By" value to 1 character (or approximately 10.5pt)
- Click "OK"
Note
Indentation is needed at the start of every paragraph. Check the sample document to see which paragraphs are indented.
3-5. Paragraph Numbering (Numbered Lists)
How to add numbers to a list. In the sample document, this feature is used for listing goals.
Steps:
- Select the lines you want to number (you can select multiple lines)
- In the "Home" tab → "Paragraph" group, click the "Numbering" button (the 1. 2. 3. icon)
- Numbers are automatically added
Changing the Number Style
Click the ▼ arrow next to the Numbering button to choose different styles (1. 2. 3. / ① ② ③ / a. b. c., etc.).
3-6. Adjusting Spacing
Adding appropriate space between paragraphs makes a document easier to read. Here, you'll add spacing between the student ID/name and the body text, and before and after the numbered list.
Add spacing between the student name and body text:
- Place your cursor on the student ID & name line
- Click the Line and Paragraph Spacing icon (
 ) in the "Home" tab
- Click "Add Space After Paragraph" from the menu
Add spacing before and after the numbered list:
- Place your cursor on the first line of the numbered list
- Click the Line and Paragraph Spacing icon and select "Add Space Before Paragraph"
- Place your cursor on the last line of the numbered list
- Click the Line and Paragraph Spacing icon and select "Add Space After Paragraph"
To set a specific spacing value:
- Place your cursor in the target paragraph
- Click the Line and Paragraph Spacing icon → "Line Spacing Options..."
- Under the "Spacing" section, change "After" to "12pt" or "6pt"
- Click "OK"
Spacing Guidelines
12pt (about 4mm) is roughly equivalent to one line of space. If it feels too wide, try reducing it to 6pt.
4. Create Your Own Document
Using the formatting skills you've learned, create a document with the same layout as the sample — but with your own content.
4-1. Choose a Topic
Pick one topic from the list below and write an essay about it. You're free to choose any topic, but here are some suggestions:
- My goals for university life
- My hobbies or talents
- My future dream
- Something I'm interested in lately
- Other (free topic)
4-2. Document Structure
Create your document with the same structure as the sample:
- Date (right-aligned)
- Title (Yu Gothic, 14pt)
- Department name (right-aligned)
- Student ID & Name (right-aligned)
- Body text
- Justified alignment
- First-line indent on each paragraph
- Write multiple paragraphs (aim for at least 300 characters total)
- Numbered list (use paragraph numbering to create a numbered list)
4-3. Change the Page Setup
Match the sample's page settings:
- Go to "Layout" tab → "Margins"
- Select "Moderate" from the list
4-4. Formatting Checklist
As you work, check off each item:
- [ ] Date is right-aligned
- [ ] Title is in Yu Gothic, 14pt
- [ ] Department, student ID, and name are right-aligned
- [ ] Body text is justified
- [ ] Paragraphs have a first-line indent
- [ ] List items use paragraph numbering
- [ ] Margins are set to "Moderate"
- [ ] Spacing is added between the student name and body text
- [ ] Spacing is added before and after the numbered list
5. Checking Document Formatting with AI
Use the Manus AI skill to check the formatting of the document you created in section 4.
5-1. Create a Manus AI Account (first time only)
- Go to manus.im
- Click "Log in" on the left side of the screen
- Click "Continue with Google"
- Enter your university Gmail address (
@t-kougei.ac.jp) and password to sign in
Free plan usage limits
Manus's free plan uses a credit-based usage limit. Once your credits run out, you won't be able to use it further. Avoid unnecessary back-and-forth and work efficiently.
5-2. Install the Formatting Checker Skill
Download the skill:report-formatter-docx.zip
Installation steps:
- Download report-formatter-docx.zip from the link above
- In Manus, click "Settings" (bottom-left) → "Skills" → "+ Add" → "Upload Skill"
- Select the downloaded file to upload it
- Open the added "Formatting Checker" skill
5-3. Check Your Document
- Attach the Word file you created in section 4 to the chat and send it
- Review the formatting issues the AI points out
- Go back to your Word document and fix the flagged items
Don't take AI feedback at face value
AI suggestions are not always accurate or appropriate. Use your own judgment to decide whether each issue is a real problem before making changes.
6. Typing Practice
Continue your typing practice from last session.
- Go to e-typing
- Take the skill check and record your score
- Compare with your previous score to track improvement
Typing Improvement Tips
- Keep your fingers on the home position (left index on
F, right index onJ) - Focus on accuracy over speed at first
- Practicing 5–10 minutes daily is the most effective approach
Submission
| # | Item | Method |
|---|---|---|
| 1 | Formatted Word document (your own topic) | Submit as instructed in class |
Final Check Before Submitting
- [ ] Does your document look the same as the sample?
- [ ] Are fonts, sizes, and alignment set correctly?
- [ ] Are paragraph first lines properly indented?
- [ ] Do list items have paragraph numbering?
- [ ] Does the file name include your student ID?
Summary
In this lesson, you learned:
- Microsoft 365 — Account setup and launching Word
- Changing fonts — Yu Gothic (headings) vs. Yu Mincho (body text)
- Font size — 14pt for titles, 10.5pt for body text
- Text alignment — Right-align, center, justify
- First-line indent — Indenting the first line of each paragraph
- Paragraph numbering — Creating numbered lists
- Adjusting spacing — Adding space between the student name and body text, and before/after the list
- Manus AI formatting check — Using an AI skill to review and fix document formatting
Next lesson, we'll explore more advanced Word features.