
Lesson 3: Pure Data Fundamentals
Learn the basic operations of Pure Data (Pd) and master how to generate and process sound.
Goals for This Lesson
- Learn Pd basics (placing objects, making connections)
- Generate a sine wave and control its frequency and volume
- Understand audio processing concepts: envelopes, filters, and delay
- Reinforce what you have learned through practice exercises
Preparation
Pd Installation
Make sure Pd is already installed from the previous lesson. If you can launch it and see the Pd console, you are good to go.
Installing Libraries
This course uses the external libraries cyclone and else. Install them as follows:
- Launch Pd
- From the menu, select Help (on Mac: Tools) → Find externals
- Type
cyclonein the search field and search - Select cyclone from the results
- Click Install
- Repeat the same for
else
Restart After Installation
After installing the libraries, quit Pd and restart it. The libraries may not load until you restart.
Basic Pd Operations
| Operation | Windows | Mac |
|---|---|---|
| Place an object | Ctrl+1 | Cmd+1 |
| Place a message | Ctrl+2 | Cmd+2 |
| Place a number box | Ctrl+3 | Cmd+3 |
| Toggle edit mode | Ctrl+E | Cmd+E |
| DSP on/off | Ctrl+/ | Cmd+/ |
Edit Mode vs. Run Mode
- Edit mode (arrow cursor): Place, connect, and move objects
- Run mode (pointer cursor): Interact with sliders and number boxes
- Switch between them with
Ctrl+E(Cmd+E)
Generating a Sine Wave
The foundation of sound is the sine wave. Let's generate one in Pd.
Objects Used
| Object | Function |
|---|---|
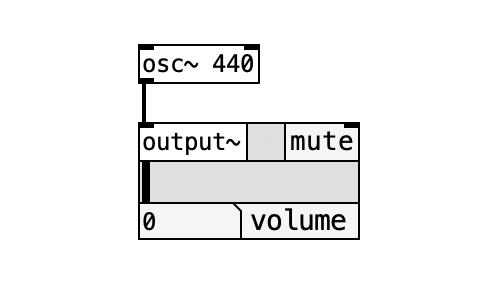
osc~ | Sine wave oscillator. Generates a sine wave at a specified frequency |
output~ | Pd's standard output object (with volume slider) |
else/out~ | Output object from the else library (more features) |
What Does ~ (Tilde) Mean?
Objects whose names end with ~ handle signals (audio data). Objects without ~ handle values (numbers and messages). This distinction is very important.
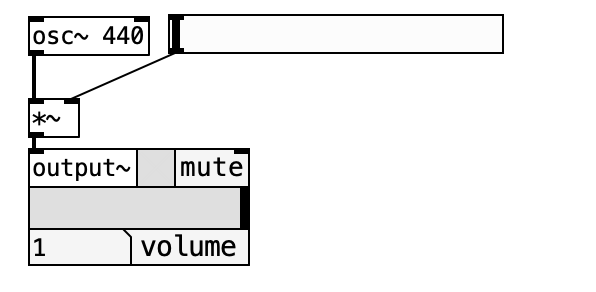
Steps
- Create a new patch (
Ctrl+N/Cmd+N) - Place an object with
Ctrl+1(Cmd+1) and typeosc~ 440 - Place
output~(orelse/out~) - Draw a line from the output (bottom) of
osc~to the input (top) ofoutput~ - Turn on DSP (
Ctrl+//Cmd+/, or use the DSP checkbox in the console) - If you hear a 440 Hz sine wave, you have succeeded
Watch Your Volume
Turn down your speaker volume before turning on DSP. Loud sounds may occur suddenly. Be especially careful when using headphones.
Controlling Frequency
Learn how to change the frequency (pitch) of the sine wave in real time.
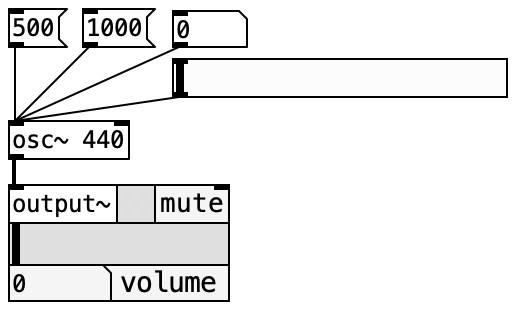
Method 1: Using Messages
- Place a message box (
Ctrl+2/Cmd+2) - Type
440in the message - Create another message and type
880 - Connect each message to the left inlet of
osc~ - Switch to run mode and click a message to change the frequency
Method 2: Using a Number Box
- Place a number box (
Ctrl+3/Cmd+3) - Connect it to the left inlet of
osc~ - In run mode, drag the number box to change the value continuously
Method 3: Using a Slider
- From the menu, select Put → HSlider (or VSlider)
- Connect the slider to the left inlet of
osc~ - Set the slider range:
- In edit mode, right-click the slider → select Properties
- Set lower to
100and upper to2000
- In run mode, move the slider to change the frequency between 100--2000 Hz
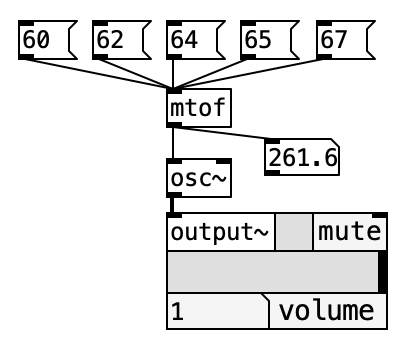
Converting Between MIDI Note Numbers and Frequency
In music, MIDI note numbers are commonly used to specify pitch. The mtof object converts MIDI note numbers to frequency (Hz).
| MIDI Note | Note Name | Frequency (Hz) |
|---|---|---|
| 60 | C4 (middle C) | 261.6 |
| 69 | A4 | 440.0 |
| 72 | C5 | 523.3 |
Steps
- Place a number box
- Place an
mtofobject - Connect them in order: number box →
mtof→osc~ - Enter
69in the number box to produce 440 Hz (the note A)
ftom
To convert in the opposite direction (frequency to MIDI note number), use ftom.
Controlling Volume
To control volume, multiply the signal by a value.
Objects Used
| Object | Function |
|---|---|
*~ | Signal multiplication. Used for volume control |
toggle | On/off switch (toggles between 0 and 1) |
Method 1: Toggle Sound On/Off
- Place a
toggle(Put → Toggle) - Place a
*~object - Connect:
osc~ 440→*~→output~ - Connect
toggle→ right inlet of*~ - Click the toggle to turn the sound on and off
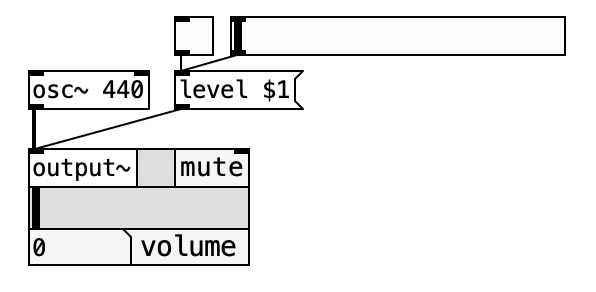
Method 2: Set Volume via Message
output~ and else/out~ can receive volume control messages.
level $1Use a slider or number box value as $1 to change the volume.
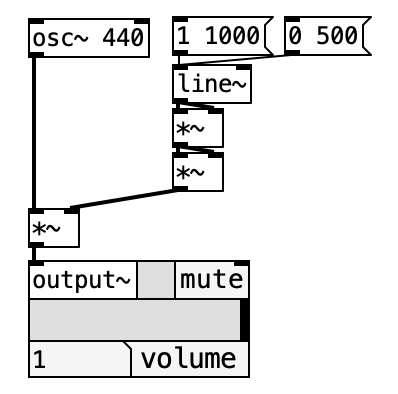
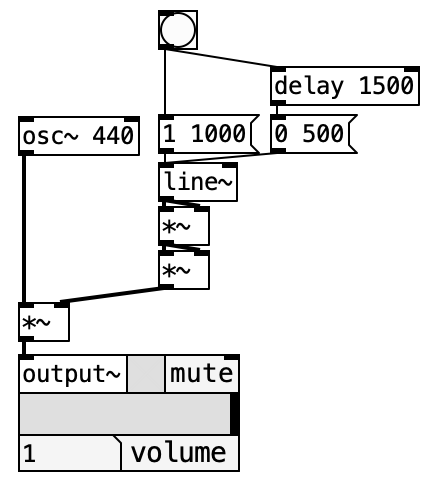
Automatic Value Changes (Envelopes)
To make sounds feel natural, it is important to change the volume over time using an envelope.
line~ -- Linear Change
line~ changes a value linearly over a specified time.
- Message
1 1000: Ramp to 1 over 1000 milliseconds - Message
0 500: Ramp to 0 over 500 milliseconds
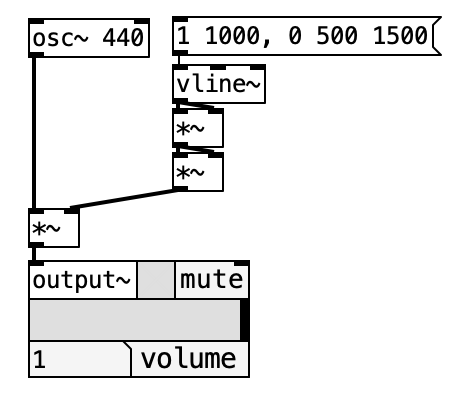
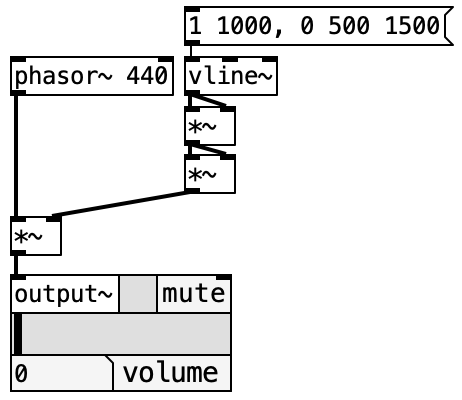
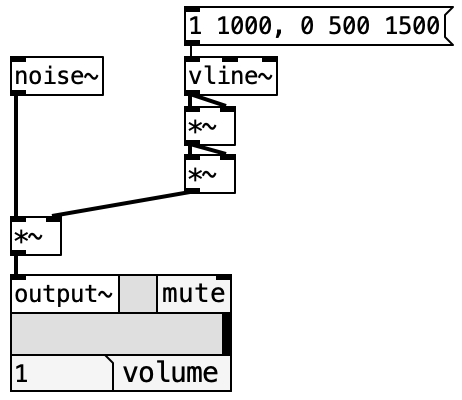
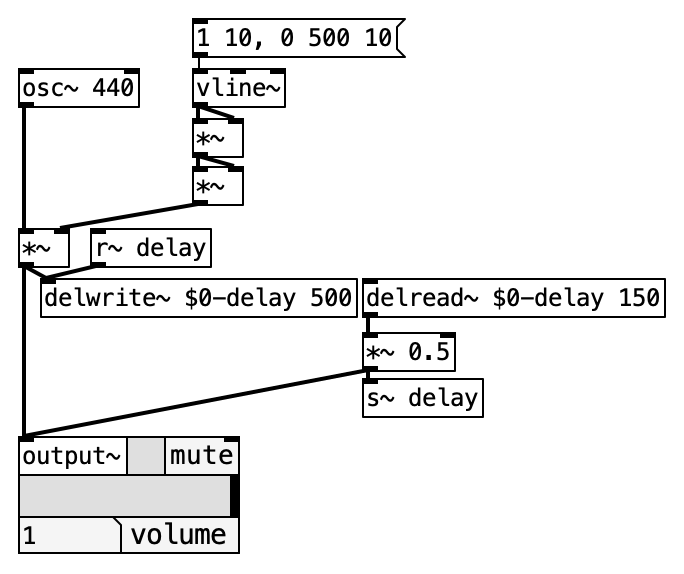
vline~ -- More Precise Changes
vline~ operates with higher timing precision than line~.
vline~ Message Format
With vline~, you can chain multiple changes in a single message using commas (,).
1 10, 0 1000 500This means "ramp to 1 in 10ms, then starting at 500ms, ramp to 0 over 1000ms." Note the spaces before and after the comma.
delay -- Delayed Execution
The delay object outputs a bang after the specified number of milliseconds.
delay 1000Outputs a bang after 1000 milliseconds (1 second).
Envelope Generators
The else library includes convenient envelope objects.
| Object | Function |
|---|---|
else/asr~ | Attack-Sustain-Release envelope |
else/adsr~ | Attack-Decay-Sustain-Release envelope |
else/envgen~ | Envelope generator with custom curves |
else/envgen~ supports a -curve option to change the shape of the curve.
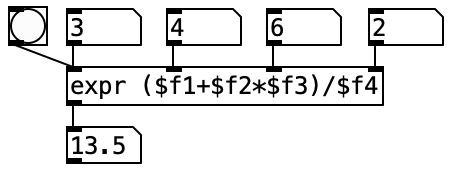
Arithmetic Operations
Pd objects for performing numerical calculations:
| Object | Function | Example |
|---|---|---|
+ | Addition | + 10 → adds 10 to the input |
- | Subtraction | - 5 → subtracts 5 from the input |
* | Multiplication | * 2 → doubles the input |
/ | Division | / 3 → divides the input by 3 |
expr | Evaluate an expression | expr $f1 * 2 + 100 |
Difference Between * and *~
*(no tilde): Multiplies values (numbers)*~(with tilde): Multiplies signals (audio data)
Values and signals are different things. Be careful not to mix them up.
expr lets you write complex formulas in a single object. $f1 represents the first input (float).

Send / Receive
As patches get more complex, the lines become hard to follow. Send (s) and Receive (r) let you transmit data without drawing lines.
How to Use
- Place an
s freqobject (sender) - Place an
r freqobject (receiver) - They are linked by the same name (in this case,
freq)
Sending Directly from a Number Box
You can send values directly from a number box's properties.
- In edit mode, right-click the number box → select Properties
- Enter a name in "Send symbol" (e.g.,
freq) - Whenever the number box value changes, it will be sent to
r freq
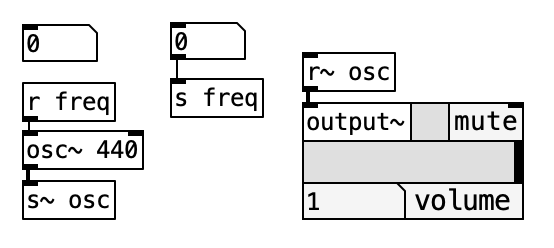
Wireless Connections
Send/Receive helps you keep your patches tidy. Use it liberally, especially in large patches.
Generating Chords
Let's play chords using multiple osc~ objects.
Steps
- Place three
osc~objects (e.g.,osc~ 261,osc~ 329,osc~ 392)- C4, E4, G4 -- a C major chord
- Mix the three signals with
+~ - Reduce the volume with
*~ 0.3(mixing 3 sounds makes it louder) - Connect to
output~
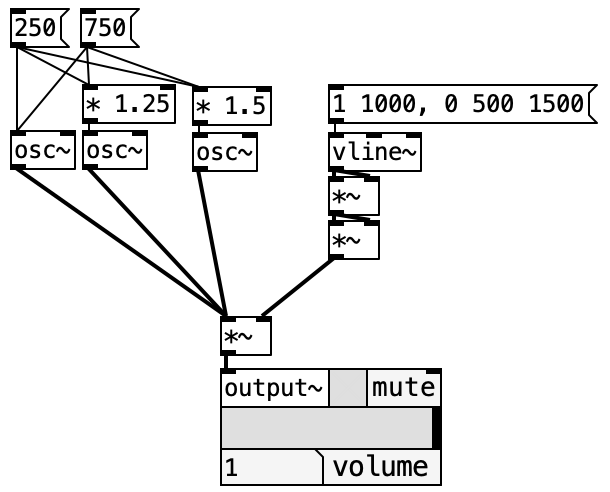
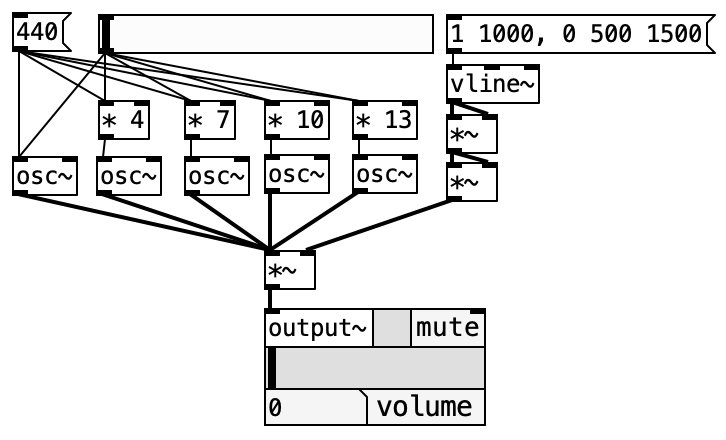
Additive Synthesis
Additive synthesis creates complex timbres by layering multiple sine waves. Adding harmonics (integer multiples of the fundamental frequency) can approximate the sound of various instruments.
Harmonic Series
| Harmonic | Frequency (fundamental = 440 Hz) |
|---|---|
| 1st harmonic (fundamental) | 440 Hz |
| 2nd harmonic | 880 Hz |
| 3rd harmonic | 1320 Hz |
| 4th harmonic | 1760 Hz |
By adjusting the volume ratio of each harmonic, you can create different timbres.
Other Oscillators
Pd also provides oscillators for generating waveforms other than sine waves.
| Object | Waveform | Characteristics |
|---|---|---|
osc~ | Sine wave | The most basic waveform. Soft sound |
phasor~ | Sawtooth wave | Bright and harmonically rich |
noise~ | White noise | Random signal containing all frequencies |
else/tri~ | Triangle wave | Similar to sine but with odd harmonics |
else/square~ | Square wave | Hollow sound. Strong odd harmonics |
Waveform and Timbre
Timbre differences are determined by harmonic content. Listen to various waveforms and experience how the sound quality differs.
Delay (Echo Effect)
Delay repeats sound after a time offset, creating spatial effects like echo and reverb.
Objects Used
| Object | Function |
|---|---|
delwrite~ | Write to a delay buffer |
delread~ | Read from a delay buffer |
cyclone/delay~ | Simple delay |
else/delay.m~ | Delay from the else library |
Basic Usage
- Place
delwrite~ $0-delay 1000(create a 1000ms buffer) - Place
delread~ $0-delay 500(read the sound delayed by 500ms) - Mix the original and delayed signals with
+~
What Does $0-delay Mean?
$0 is replaced by a unique number for each patch instance. This prevents buffer name collisions when multiple copies of the same patch are open. $0-delay means "a buffer named 'delay' unique to this patch."
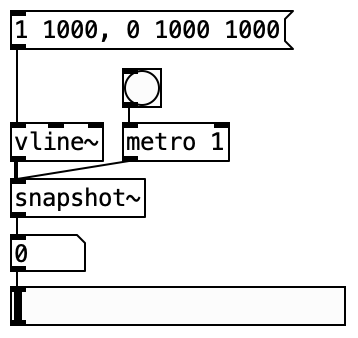
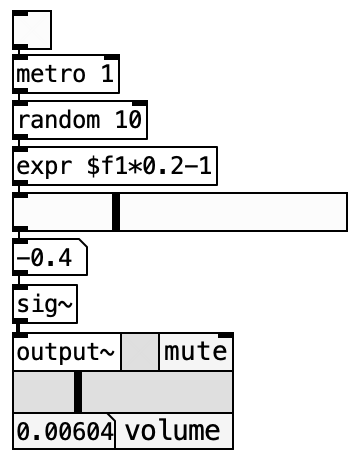
Converting Between Signals and Values
Pd has two kinds of data: signals (audio, shown as thick lines) and values (numbers/messages, shown as thin lines). Sometimes you need to convert between them.
Signal → Value
| Object | Function |
|---|---|
snapshot~ | Capture the current signal value (use with metro) |
else/s2f~ | Convert signal to value (else library) |
else/numbox~ | Number box that displays signal values |
snapshot~ is used together with metro (metronome). metro 100 outputs a bang every 100ms, at which point snapshot~ captures the signal value.
Value → Signal
| Object | Function |
|---|---|
sig~ | Convert a value to a signal |
else/f2s~ | Convert a value to a signal (else library) |
Turn On DSP
Signal-related objects will not work unless DSP is on. If values are not showing or changing, first check that DSP is enabled.
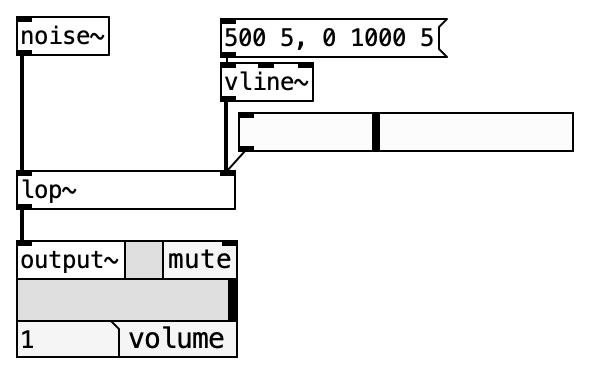
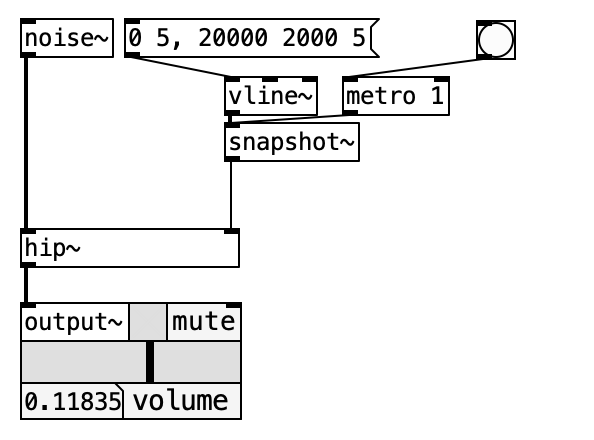
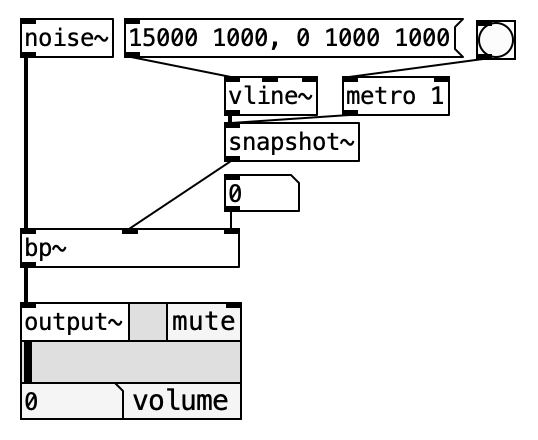
Filters
Filters emphasize or cut specific frequency ranges.
Basic Filters
| Object | Type | Function |
|---|---|---|
lop~ | Low-pass filter | Passes frequencies below the cutoff |
hip~ | High-pass filter | Passes frequencies above the cutoff |
bp~ | Band-pass filter | Passes only frequencies around the cutoff |
Usage
noise~ → lop~ 1000 → output~This example extracts only the components below 1000 Hz from noise (resulting in a muffled sound).
Filter and vline~ Compatibility
lop~ can accept vline~ on its right inlet to smoothly change the cutoff frequency, but hip~ and bp~ cannot accept vline~ directly on their right inlets. Use sig~ to convert the value to a signal first.
Value vs. Signal Lines
When connecting objects, pay attention to the difference between thin lines (values) and thick lines (signals). Signal objects connect with signal (thick) lines. Mixing value and signal objects can cause unexpected behavior.
Practice Exercises
Try the following exercises. Use the objects you have learned so far.
Exercise 1: Output a 1000 Hz Sine Wave
Create a patch that outputs a 1000 Hz sine wave through output~.
Hint
Simply connect osc~ 1000 to output~.
Exercise 2: Switch Frequency with Two Messages
Create two message boxes (500 and 1000) that let you switch the osc~ frequency between 500 Hz and 1000 Hz by clicking.
Hint
Create two message boxes and connect each to the left inlet of osc~.
Exercise 3: Play Sound for One Second with a Button
Create a patch where clicking a bang (button) plays a 1000 Hz sine wave for one second and then stops automatically.
Hint
Use vline~ to control the volume. Connect: bang → message 1 10, 0 10 990 → vline~ → *~. This fades in over 10ms and fades out 10ms starting at 990ms.
Exercise 4: Fade In and Stop After One Second
Create a patch where clicking a bang gradually increases the volume (fade in), then stops after one second.
Hint
Use a vline~ message like 1 500, 0 10 1000. This fades in over 500ms, then at 1000ms fades out over 10ms.
Exercise 5: Add Echo
Add an echo effect to the Exercise 3 patch using delwrite~ and delread~, with the echo occurring 0.5 seconds after the original sound.
Hint
Use delwrite~ $0-echo 1000 to create a 1-second buffer, and delread~ $0-echo 500 to read the sound delayed by 500ms. Reduce the delayed signal volume with *~ 0.5 and mix it with the original for a natural echo.
Exercise 6: [Advanced] Broadcast Chime (Ding-Dong-Dang-Dong)
Create a chime sound like a broadcast chime.
Hint
Play four notes in sequence. For example:
- Ding: G5 (784 Hz)
- Dong: E5 (659 Hz)
- Dang: C5 (523 Hz)
- Dong: G4 (392 Hz, longer duration)
Use delay objects to offset the timing of each note, and apply vline~ envelopes to each sound to make it chime-like. Make the last note ring longer.