
Lesson 7: Electronic Instruments with Pd + micro:bit
Goals for This Lesson
Combine Pd and micro:bit sensors to build simple electronic instruments. The goal is to apply the audio processing and sensor integration techniques you have learned so far to create instruments you can actually play.
In this lesson, you will build four electronic instruments:
- A handbell using the accelerometer
- A wind effect using the sound sensor
- A drum using a pressure sensor
- [Reference] Ocean waves using the accelerometer
Building a Handbell with the Accelerometer
Use the micro:bit's accelerometer to create a handbell that plays a sound when you shake it.
Reading Accelerometer Values
The micro:bit has a 3-axis (X, Y, Z) accelerometer. The values change when you shake or tilt the device.
- X axis: Left-right tilt
- Y axis: Forward-backward tilt
- Z axis: Up-down movement (gravity direction)
To detect a shaking motion, focus on the change in acceleration (especially the Z or X axis).
From Shake Detection to Sound Playback
The basic flow for the handbell is:
- Receive accelerometer values from the micro:bit
- If the change exceeds a certain threshold, determine that a "shake" has occurred
- When a shake is detected, play a bell sound sample
Adjusting the Threshold
The sensitivity of shake detection depends on the threshold. If the value is too low, even small movements trigger the sound. If it is too high, you need to shake very hard. Experiment to find the right value.
Debouncing
If a single shake triggers the sound multiple times, add a debouncing mechanism using else/del or timer to prevent re-triggering within a certain time window.
Patch Example
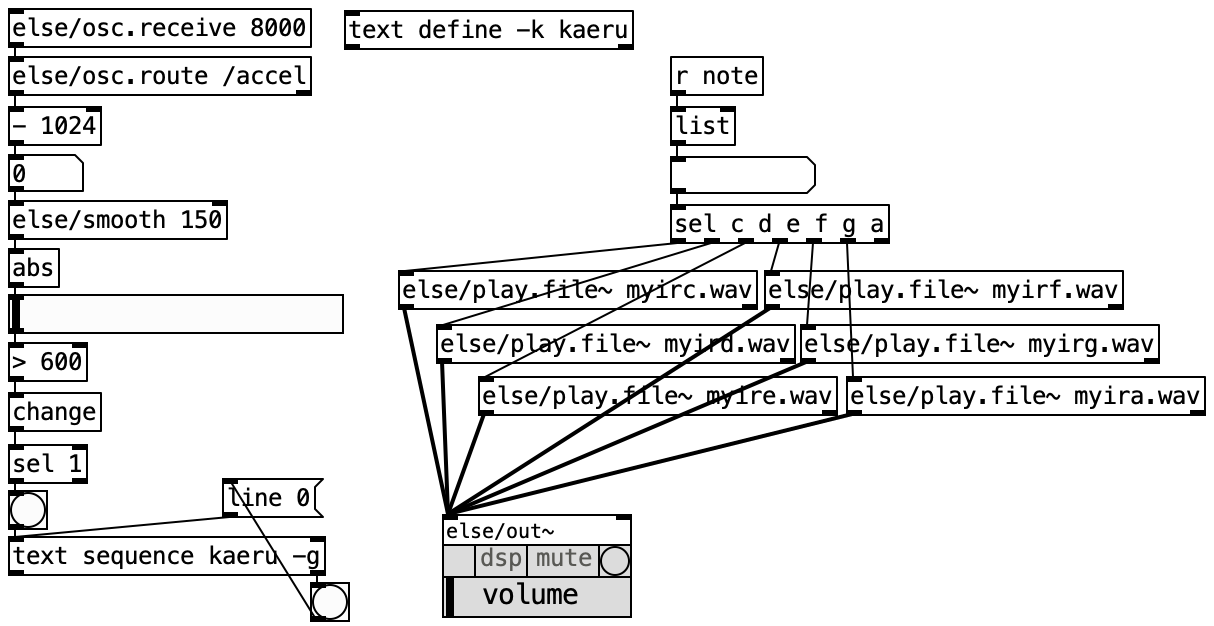
Creating a Wind Effect with the Sound Sensor
Use the micro:bit's sound sensor (microphone) to control a wind-like noise effect by blowing on the device.
How the Sound Sensor Works
The micro:bit V2 has a built-in microphone. By sending the detected volume level to Pd, you can control parameters based on input intensity.
- Quiet environments produce small values
- Blowing on the mic or making loud sounds produces larger values
Controlling Noise with Breath
Wind sounds can be recreated using noise. By varying the volume and filter settings of the noise based on breath intensity, you can create a wind-blowing effect.
- Get the volume value from the micro:bit's sound sensor
- Map the value to the volume of a
noise~object - Use
bp~(band-pass filter) or similar to shape the sound like wind - Vary both volume and filter frequency based on breath strength
Making Wind Sound Natural
- Adding slight random variation to the filter frequency makes the wind sound more natural
- Use
else/lowpassto smooth the value changes, preventing abrupt volume shifts
Patch Example
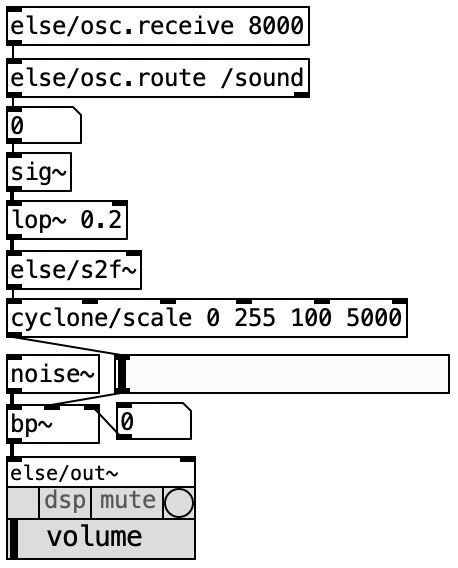
Building a Drum with a Pressure Sensor
Connect an external pressure sensor (force-sensitive resistor) to the micro:bit and play drum sounds with volume that responds to how hard you hit.
Connecting the Pressure Sensor
Connect a pressure sensor (FSR: Force Sensitive Resistor) to one of the micro:bit's analog input pins.
- Connect one terminal of the pressure sensor to a micro:bit pin (e.g., P0)
- Connect the other terminal to GND
- Use a pull-up resistor if needed
Wiring Caution
- Confirm which pin (P0, P1, P2, etc.) you are using before writing the program
- Be careful to avoid short circuits
Expressing Dynamics
The pressure sensor value changes with how hard you press or hit it. By mapping this value to volume, you can achieve dynamic performance.
- Get the pressure sensor value from the micro:bit
- When the value exceeds a threshold, determine that a "hit" has occurred
- Convert the pressure value to a volume range (0 to 1)
- Control the drum sound volume with the converted value
Enhancing Expressiveness
- Capturing the peak value at the moment the threshold is crossed lets you reflect the hit's intensity
- Using multiple pressure sensors enables playing several drum parts (kick, snare, hi-hat)
Patch Example
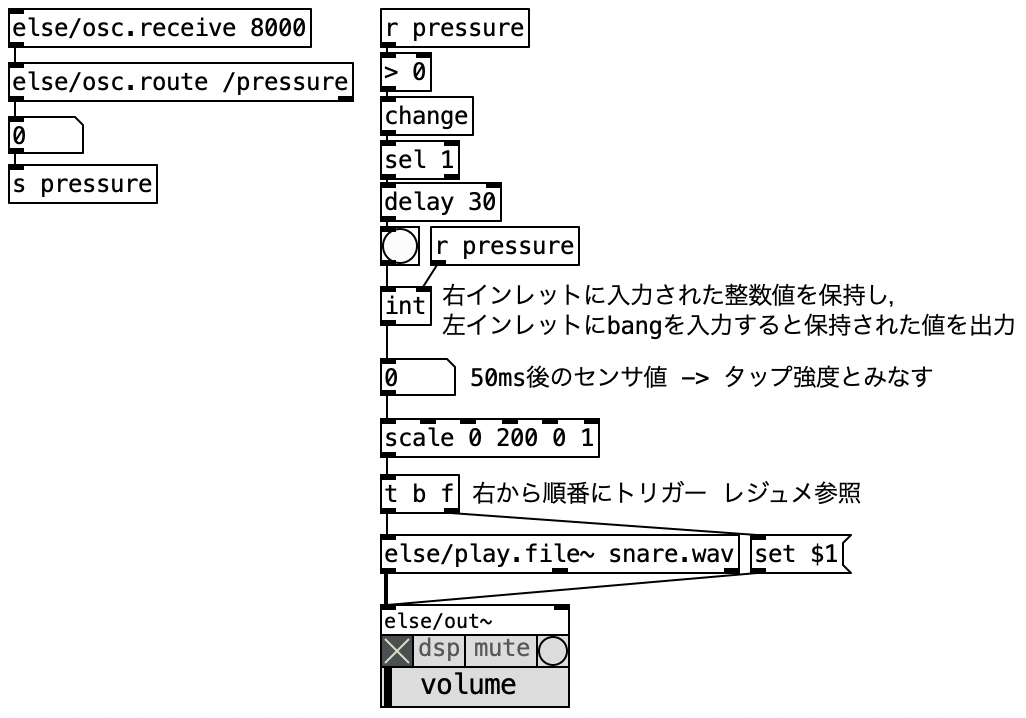
[Reference] Simulating Ocean Waves with the Accelerometer
Use the else/plate.rev.m~ object to create a wave-like reverb effect that responds to accelerometer motion.
About plate.rev.m~
else/plate.rev.m~ simulates a plate reverb, which models the vibrations of a metal plate to produce reverberation. By linking the accelerometer values to this reverb, you can create an acoustic effect that shifts like ocean waves in response to movement.
Implementation Flow
- Get the accelerometer values (X and Y axes) from the micro:bit
- Map the acceleration values to
else/plate.rev.m~parameters (reverb time, wet/dry ratio, etc.) - Apply the reverb to an input source (noise, sine wave, etc.)
- Tilting and rocking the device produces a wave-like reverberation effect
Parameter Tuning Tips
- Linking decay time to the magnitude of acceleration makes larger movements produce longer reverb
- Linking the wet/dry ratio to tilt changes the reverb depth based on angle
- Using noise as the input source creates an ocean-wave-like sound
Patch Example
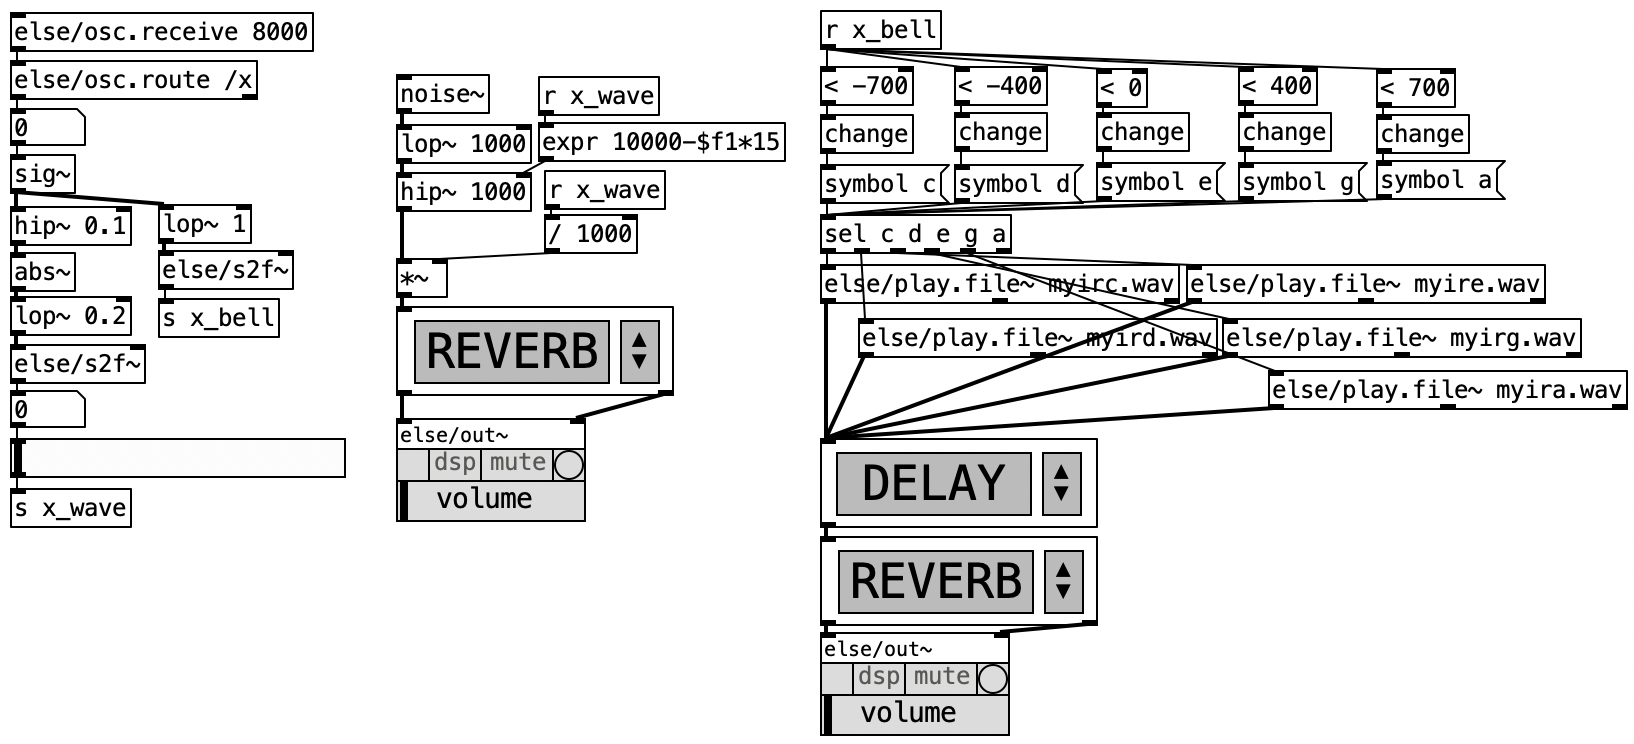
Preparing for Your Project
From the next lesson onward, you will combine everything you have learned to create an original sound art piece.
Consider the following questions:
- Which sensors do you want to use? Accelerometer, light, sound, pressure, buttons, etc.
- What kind of sound do you want to produce? Instrument sounds, environmental sounds, electronic sounds, voice processing, etc.
- What kind of interaction do you want? Shake, tilt, hit, blow, touch, etc.
- What experience do you want to provide? The joy of playing, sensing environmental changes, collaborative sound-making, etc.
Organizing Your Ideas
Jot down the following three things in a notebook:
- Sensors you want to use (multiple is fine)
- The sound you imagine (describe in words or reference tracks)
- The interaction you envision (body movements)
Combine these to come up with your own electronic instrument or sound art concept.