
Lesson 5: Audio File Handling
Goals for This Lesson
Learn how to work with audio files and control them using micro:bit sensors.
Specifically, this lesson covers:
- Playing, stopping, and looping audio files
- Pitch shifting and time stretching
- Fade-in, fade-out, and crossfade
- Recording audio
Playing, Stopping, and Looping Audio Files
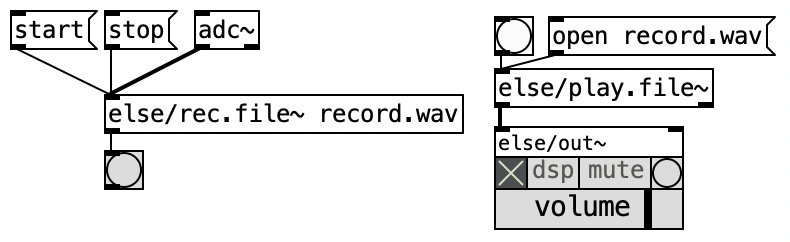
In Pd, you can play audio files using the else/play.file~ object. It supports WAV, AIFF, and other audio formats, and lets you control playback, stopping, and looping.
How to Use
- Create an
else/play.file~object - Place the audio file in the same directory as your Pd patch
- Use message objects to send the following commands
Basic Commands
| Message | Action |
|---|---|
open filename | Open an audio file |
start | Start playback |
stop | Stop playback |
loop 1 | Enable loop playback |
loop 0 | Disable loop playback |
Important
Audio files must be in the same folder as the Pd patch. If they are in a different folder, Pd will not find them and will produce an error.
Patch Example
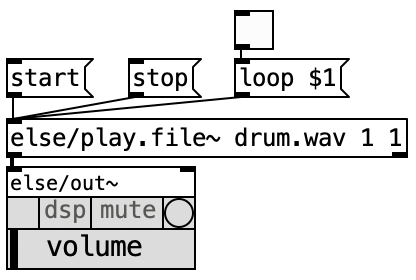
Send the start message to begin playback and stop to stop it. Send loop 1 before start to loop the audio continuously.
Pitch Shifting and Time Stretching
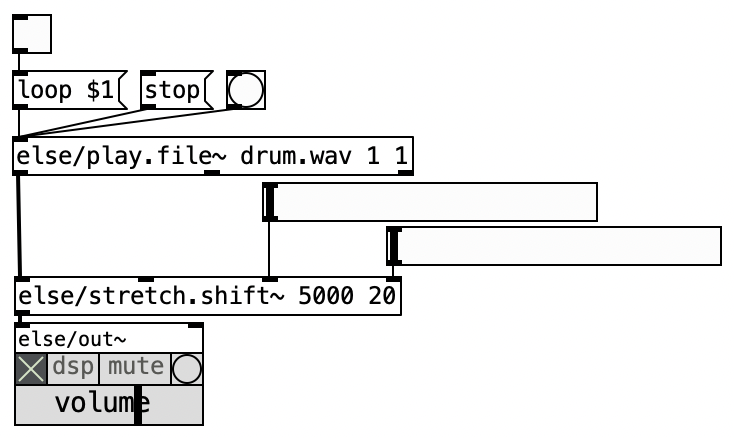
The else/stretch.shift~ object lets you change the pitch or tempo of an audio file in real time.
Inlet Description
else/stretch.shift~ has multiple inlets, each controlling a different parameter.
| Inlet | Parameter | Description |
|---|---|---|
| 1st inlet | Buffer size | Size of the processing buffer |
| 2nd inlet | Pitch | Pitch change amount (in cents) |
| 3rd inlet | Tempo | Playback speed (in percent) |
Pitch Settings
Pitch is specified in cents.
- 0: Original pitch (no change)
- 1200: One octave up
- -1200: One octave down
- 700: A perfect fifth up
Pitch Reference
100 cents = 1 semitone. 1200 cents = 12 semitones = 1 octave.
Tempo Settings
Tempo is specified as a percentage.
- 100: Original speed (no change)
- 200: Double speed
- 50: Half speed
Patch Example
Fade-In, Fade-Out, and Crossfade
To smoothly switch between audio sources or gradually change volume, use fade-related objects.
Objects Used
| Object | Function |
|---|---|
else/xselect~ | Select one from multiple inputs for output |
else/xfade~ | Crossfade between two audio sources |
else/xgate~ | Gate that passes or blocks audio |
How Crossfade Works
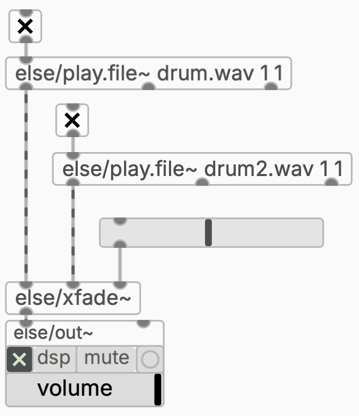
A crossfade gradually lowers the volume of one source while raising the volume of another, creating a smooth transition.
With else/xfade~, a value from -1 to 1 controls the mix ratio between two sources.
- -1: Only input 1 is heard
- 0: Both inputs are mixed equally
- 1: Only input 2 is heard
Patch Example (xfade~)
A patch that crossfades between two sources (drum.wav and drum2.wav) with a slider. Sending a value from 0 to 1 into the right inlet of else/xfade~ controls the mix between the two sources.
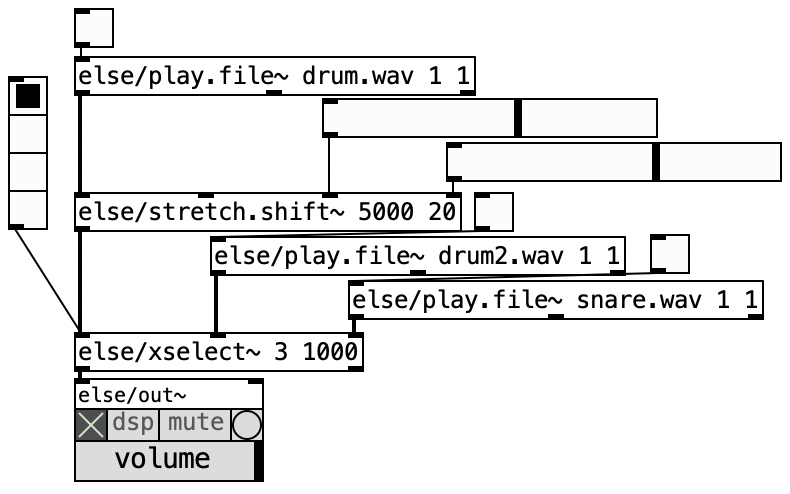
Switching Between Multiple Sources (xselect~)
To switch between three or more sources, use else/xselect~. Its arguments specify the number of inputs and the fade time (in milliseconds). Send an integer (0 to N−1) to its right inlet to choose which source to play; the patch smoothly fades from the previous source to the new one over the specified fade time.
Example: else/xselect~ 3 1000 — switches among 3 inputs with a 1000 ms crossfade.
- 0: Input 1 is heard
- 1: Input 2 is heard
- 2: Input 3 is heard
While else/xfade~ controls the mix between two sources as a continuous value (0–1), else/xselect~ uses an integer to choose which source plays.
Patch Example (xselect~)
A patch that switches between three sources using integers (0, 1, 2). Sending a radio-button or number value to the right inlet of else/xselect~ triggers a smooth crossfade to the chosen source.
Recording
Pd can also record audio from a microphone input and save it to a file.
Objects Used
| Object | Function |
|---|---|
adc~ | Receive audio signal from the microphone input |
else/rec.file~ | Record an audio signal to a file |
Steps
- Use
adc~to capture the microphone signal - Connect it to
else/rec.file~ - Send an
open filenamemessage to specify the file name - Send
startto begin recording - Send
stopto stop recording
File Save Location
Recorded files are saved in the same directory as the Pd patch. If the patch has not been saved, the file location will be undefined.
Patch Example
Practice Exercises
Try the following exercises. Use what you have learned about micro:bit integration from previous lessons.
Exercise 1: Drum Loop Play/Stop
Create a patch that uses the micro:bit's A and B buttons to control playback and stopping of a drum loop.
Hint
- Use
else/play.file~to load a drum loop audio file - Send
startwhen the A button is pressed - Send
stopwhen the B button is pressed - Set
loop 1for continuous looping - Use the
selectobject to route button values to the appropriate messages
Exercise 2: Tilt-Controlled Tempo
Add a feature to the Exercise 1 patch where tilting the micro:bit (accelerometer) changes the playback tempo.
Hint
- Use
else/stretch.shift~to control playback speed - Map the micro:bit's tilt value to a tempo percentage (e.g., 50--200) using
scaleor similar - Check the tilt value range first, then convert it to an appropriate range
Exercise 3: Light Sensor Crossfade
Create a patch that switches audio sources based on the light sensor value:
| Light Sensor Value | Behavior |
|---|---|
| 70 or above | Silence (no sound) |
| 30--70 | Play source 1 |
| Below 30 | Play source 2 |
Hint
- Use
else/xfade~orelse/xselect~for crossfading - Use
mosesto branch based on the light sensor value - Map the value range to the crossfade parameter (0--1)
- You can also use
else/xgate~to mute the sound when the value is above 70
Exercise 4: Light-Controlled Recording, A Button Playback
Create a patch that starts/stops recording based on the light sensor value and plays back the recording when the A button is pressed.
Hint
- Use
adc~andelse/rec.file~for the recording function - Start recording when the light value drops below a threshold, stop when it goes above
- Use
else/play.file~to play back the recorded file - When the A button is pressed, send
open filenamefollowed bystart - Use the same file name for both recording and playback